

Calculation Designer: Custom Members
You can build cross-dimensional Custom Member calculations without hand writing code. Through this interface, you can create advanced custom members using multiple hierarchy selections and/or functions.
When you click on the “Custom Element” option in the Calculation Designer window, you will be presented with this window:
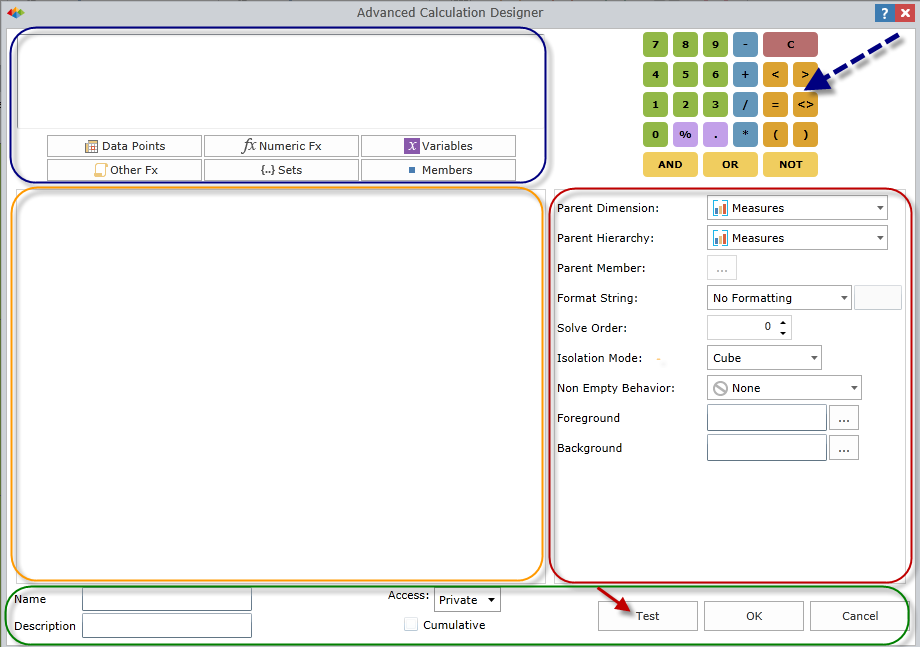
There are five main sections:
1. Calculation Editor (outlined in blue): To define the calculation, you can click one or more of the six calculation options: Data Point, Numeric Fx (functions), Variables, Other Fx, Sets, Members. The section above the options allows you to view, insert and modify the calculation.
2. Options Editor (outlined in orange): To define the calculation option, you can make different choices and selections . This process is described further below.
3. Mathematical Operations (indicated with the blue arrow): To insert mathematical operations between the elements that have been selected, you can click on either standard mathematical functions or logical operators for MDX queries.
4. Property & Format Settings Panel (outlined in red): You can designates the properties for the calculated member in this panel.
5. Metadata Panel (outlined in green): You can name the advanced calculation and designate the access (private or public) permissions. Click here for further information.
Custom Member Workflow
The steps to use the wizard are as follows:
- First, define the calculation. There are a few steps in which to do this:
- Select a calculation option (e.g. Data Point, Sets, etc.) and make the necessary choices and selections in the Option Editor section.
- Then, add mathematical operators to the calculation to either manipulate the formula with static values or add further calculation options to the equation.
- Next, select the property and format settings for the calculation.
- You then give the advanced calculation a name and description.
- Finally, you select the security access for the new calculation.
- You can click “Test” to check that the syntax of the calculation is correct.
- Once tested, click “OK” to save the new calculation to the server.
Calculation Options
There are the six calculation options to utilize to define an advanced calculation:
1. Data point
A Data Point is a coordinate in the data model that represents a metric or value (also known as a “tuple”). This function allows you to easily define a Data Point.
In the Options Editor section, you can select the measures and/or corresponding elements for each dimension/hierarchy that define the exact data point in the data model.
NOTE: When you click on the filter icon next to the word hierarchy, you get a drop-down menu to more easily select elements. You can search or scroll through the elements.
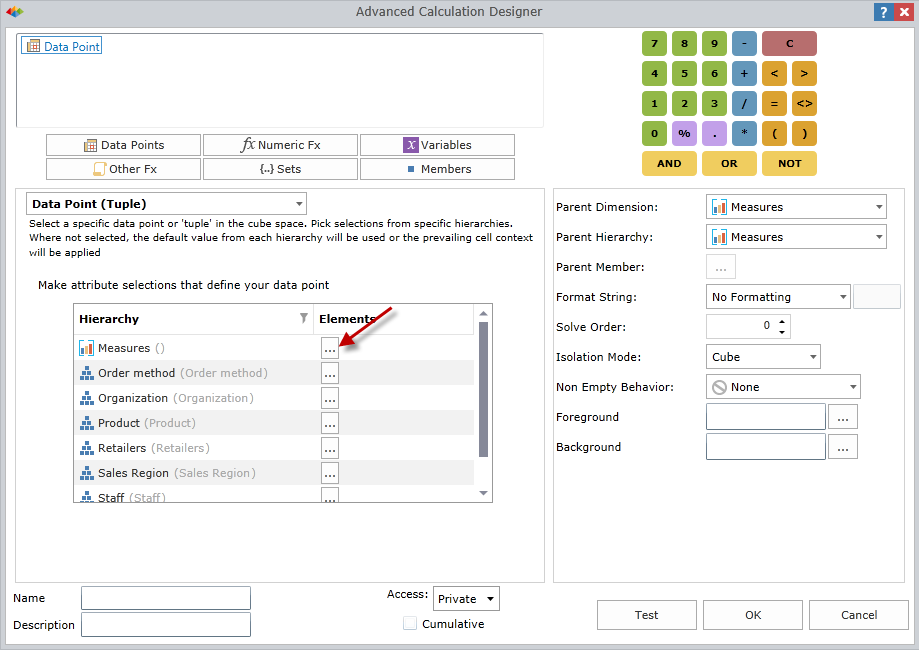
To select an element per hierarchy, click on the ellipsis button next to each hierarchy (indicated by red arrow). A pop-up window will appear:
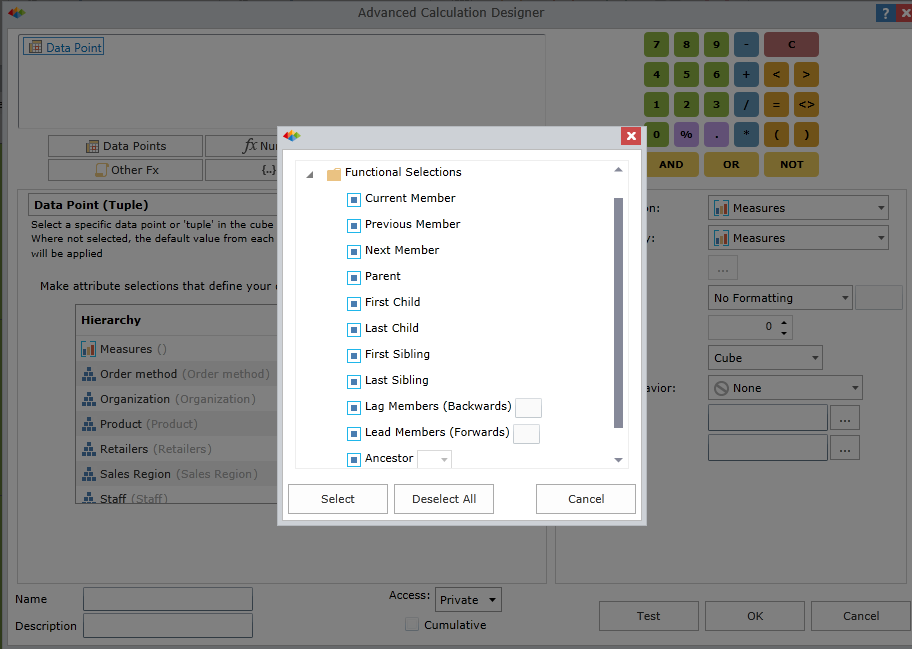
You can select the desired element from the list of the possible elements
Alternatively, you can make a Functional Selection. This a list of built-in reference functions so that the user can define a function for selecting the appropriate element without have to pick specific, hard coded value. (See image below)
The Functional Selections include:
| TERM: DEFINITION | EXAMPLE |
|---|---|
| Current: this uses the currently selected element in the given hierarchy, in the context of the query, in the calculation. | If the query has the month “January 2014” selected for dates, the calculation will use January 2014. |
| Previous: this uses the member that appears BEFORE the currently selected element in the given hierarchy, in the context of the query, in the calculation. | If the query has the month “January 2014” selected for dates, the calculation will use December 2013. |
| Next: this uses the member that appears AFTER the currently selected element in the given hierarchy, in the context of the query, in the calculation. | If the query has the month “January 2014” selected for dates, the calculation will use February 2014. |
| Parent: this uses the member that is the parent element of the currently selected element in the given hierarchy, in the context of the query, in the calculation | If the query has the month “January 2014” selected for dates, the calculation will use Quarter 1 2014. |
| First child: this uses the first child member of the currently selected element in the given hierarchy, in the context of the query, in the calculation. | If the query has the month “January 2014” selected for dates, the calculation will use January 1st 2014. |
| Last child: this uses the last child member of the currently selected element in the given hierarchy, in the context of the query, in the calculation. | If the query has the month “January 2014” selected for dates, the calculation will use January 31st 2014. |
| First Sibling: this uses the first child member that shares the same parent element as the currently selected element in the given hierarchy, in the context of the query, in the calculation. | If the query has the month “February 2014” selected for dates, the calculation will use January 2014. |
| Last Sibling: this uses the first child member that shares the same parent element as the currently selected element in the given hierarchy, in the context of the query, in the calculation. | If the query has the month “February 2014” selected for dates, the calculation will use March 2014. |
| Lag: this uses the member that appears “n” positions BEFORE the currently selected element in the given hierarchy, in the context of the query, in the calculation. (Where “n” is the count value entered in the text box”). | If the query has the month “January 2014” selected for dates, the calculation will use July 2013, if lagged by “6”. |
| Lead: this uses the member that appears “n” positions AFTER the currently selected element in the given hierarchy, in the context of the query, in the calculation. (Where “n” is the count value entered in the text box”). | If the query has the month “January 2014” selected for dates, the calculation will use July 2014, if lead by “6”. |
| Ancestor: this uses the member that is the ancestor element of the currently selected element in the given hierarchy, in the context of the query, in the calculation. Users must select the level in the drop down to choose which ancestor to select. | If the query has the month “January 2014” selected for dates, the calculation will use the year 2014, if ancestor level is “year”. |
| Cousin (Parallel Period): this uses the member that is the “relative” element of the currently selected element in the given hierarchy, in the context of the query, in the calculation. Users must select the level in the drop down to choose which relative relationship to use. | If the query has the month “January 2014” selected for dates, the calculation will use January 2013, if the relationship level is set to “year”. The calculation will use October 2013, if the relationship level is set to quarter. |
NOTE: You can build Data Point selections with hard selections, Functional Selections as well as Parameters.
2. Numeric Function
Numeric Function is a point-and-click interface to easily build MDX mathematical calculations.
Click the Numeric Function button and a drop-down list of mathematical operations that can run over the set of elements will be available.
| TERM | DEFINITION |
|---|---|
| Aggregate | Aggregates a set of data points/tuples using an optional numerical value. Unlike SUM, it will account for non-additive metrics |
| Sum | Adds a set of data points/tuples using an optional numerical value. It sums values verbosely, ignoring non-additive metrics |
| Average | Averages a set of data points/tuples using an optional numerical value. It averages values verbosely, ignoring non-additive metrics |
| Maximum | Gets the maximum value from a set of data points/tuples using an optional numerical value. |
| Median | Gets the Median value from a set of data points/tuples using an optional numerical value |
| Standard Deviation | Gets the Standard Deviation from a set of data points using an optional numerical value |
| Variance | Gets the Variance from a set of data points/tuples using an optional numerical value. |
| Covariance | Gets the Covariance from a set of data points/tuples using an optional numerical value. |
| Rank | Returns the rank a data point/tuple within a given set of data points/tuples |
| Coalesce Empty | Returns a numeric value for an empty data point/tuple |
After selecting the Numeric Function, select the dimension and the relevant hierarchy.
Once selected, choose the elements that the numeric function will operate over in the element tree. Optionally, you can select a specific data point that the Numeric Function operates with. This data point interface is identical to the Data Point options described above.
3. Variables
The Variables function to allows you to inject static values into calculations and logic. Variables are replaced out of the equation when the formula is evaluated on query execution to its set value.
Click on “Variable” and a list of previously created variables is displayed in the Options Editor.
Alternatively, you can click on “New Variable” to add a new variable. Click here for further information on the Variables Designer wizard.
4. Other Fx
Other Functions contains a list of MDX functions not presented in the Numeric Function list.
You can click on “Other Fx” and a list will be displayed in the below section of other possible MDX functions. You can also manually fill in arguments for these MDX functions using plain text in addition to the Calculation Option buttons.
5. Sets
Sets allows you to build a classic selection or “set” of elements from within the given hierarchy.
You can click on Sets and then select the dimension and subsequent hierarchy.
Optionally, you can select a specific data point that the numeric function operates with. This interface is identical to the Data Point options described above.
6. Members
The Members function allows you to select individual elements for the calculation.
Once you click on Members, you can select the dimension and subsequent hierarchy for the desired element.
Optionally, you can select a specific data point that the Numeric Function operates with. This data point interface is identical to the Data Point options described above.
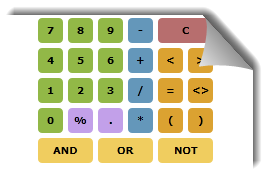
Mathematical Operations Panel
This panel contains an array of typical calculator operations and logical operators to insert into the calculation.
Property and Format Settings Panel
This panel exposes a variety of options for you to define the advanced calculation.
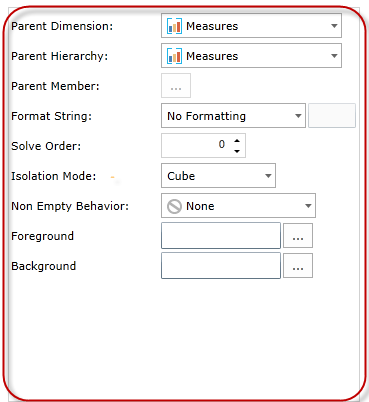
- First, designate theParent Dimension and Hierarchyfirst. You can select these from the drop-down lists.
- The advanced calculation can OPTIONALLY have a Parent Member. This will place the calculation as a CHILD in the hierarchical tree under this parent element. If no parent element is provided, the calculation will be displayed as the top level of the tree.
- You then apply a Format String that will determine how metrics for this calculation are formatted. You can select from a list of presets or provide your own custom format.
- Format string options include a variety of presets - like currency, percentage and standard number masks like "#,#".
- You can also supply a custom format. Custom format masks need to conform to the standards described here here.
- Last, you can supply a custom formulation which is a formula driven string that will produce a format mask based on mathematical or query driven inputs.
- You can utilize Solve Order to determine the order in which the calculation will be solved in cases where the calculation references another calculation.
- Isolation Mode sets the scope isolation of the calculation, to be run before or after scripting on the cube. Click here for more detail.
- The Non-Empty Behavior only applies to custom MEASURES and is set to an existing measure that is used to determine the behavior of calculated members when resolving empty cells.
- Foreground and Background colors allow you to format the calculation so that it appears with colors in the grid.
Metadata Panel

Once you have created your custom calculation, you can provide a Name and Description for the new calculated member.
Next, choose the Access permissions.
- Private access ensures that the definition is only available to the user that created it. If a private calculation is used in public content, other users will be able to run queries using the item, but they CANNOT change or edit its definition.
- Public access allows any user with access to this cube and READ access to the element's definition to consume the definition. If the user also has write access, they can edit and update the definition as well. An automatic pop-up window will appear if choosing public. Make your selections and click OK. For further information about Security and Access permissions, click here.
Test
This button allows you to test the new calculation’s syntax (indicated with red arrow above).
- If the syntax is correct, the response will be, “Query passed!”.
- If the syntax in incorrect, there will be an error message.
Then, you can select the checkbox for Cumulative to enable users to multi-select and combine columns and/or rows for query outcomes when using parameters.
Click OK to finalize the calculation. The application will automatically display the relevant element tree in the Custom Elements folder in the main Data Discovery interface.
Maintaining Custom Members
- To Edit a custom member, you can right click on the custom member and choose "Edit custom member" from the context menu.
- To Delete a custom member, if the custom element if NOT being used in a report, another custom member or custom set, right click on the custom member and choose "Delete”. Warnings will be provided in the case of conflicts.
Home |
Table of Contents |
Index |
User Community
Pyramid Analytics © 2011-2022